Review: Purely Alpaca Outdoor Adventure Socks, by Thomas Christianson

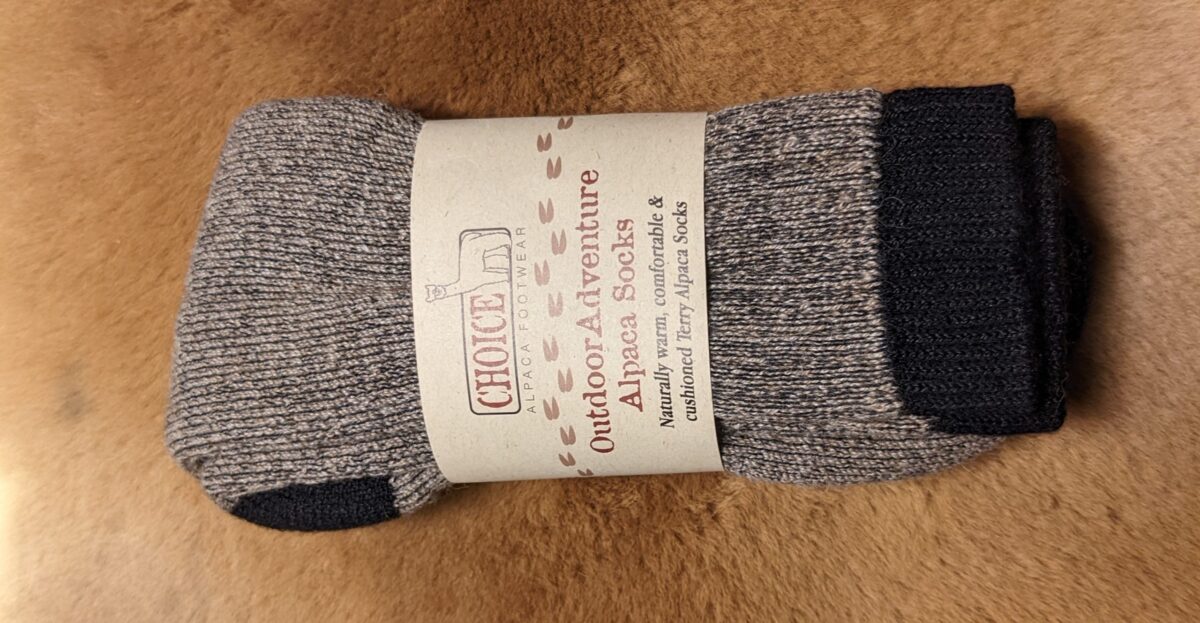
Purely Alpaca Outdoor Adventure Socks are made with a warm, comfortable, moisture-wicking, odor-resistent blend of alpaca, microfiber, nylon, and lycra. They are machine washable and tumble dryable.

They are priced at $25.95 a pair at the time of this writing from purelyalpaca.com. You may want to think about trying a pair.

The Backstory

My buddy from high school and I have been through a lot together. I was with him when he broke his arm. He was with me when I ricocheted an arrow off a snowman and into the side of my parent’s above-ground swimming pool. I was the best man at his wedding. He was the best man at my wedding. He had a daughter on my birthday. I had a daughter on his birthday. We have quite a bit of shared experience.

A few years ago, my friend began telling me about his wonderful alpaca socks. He said that they were so breathable that he could wear them summer or winter, that they were so odor-resistant that he could wear them a week at a time without laundering, and that they were by far the most comfortable socks that he had ever owned.

I was intrigued, because I love a good pair of socks. I began keeping my eyes open for an opportunity to give a pair of alpaca socks a try.

Recently, I ran across purelyalpaca.com online. Their outdoor adventure socks looked very interesting. So I sent them a message, asking if I could try out a pair. They were kind enough to agree. About a week later, a package arrived in the mail.
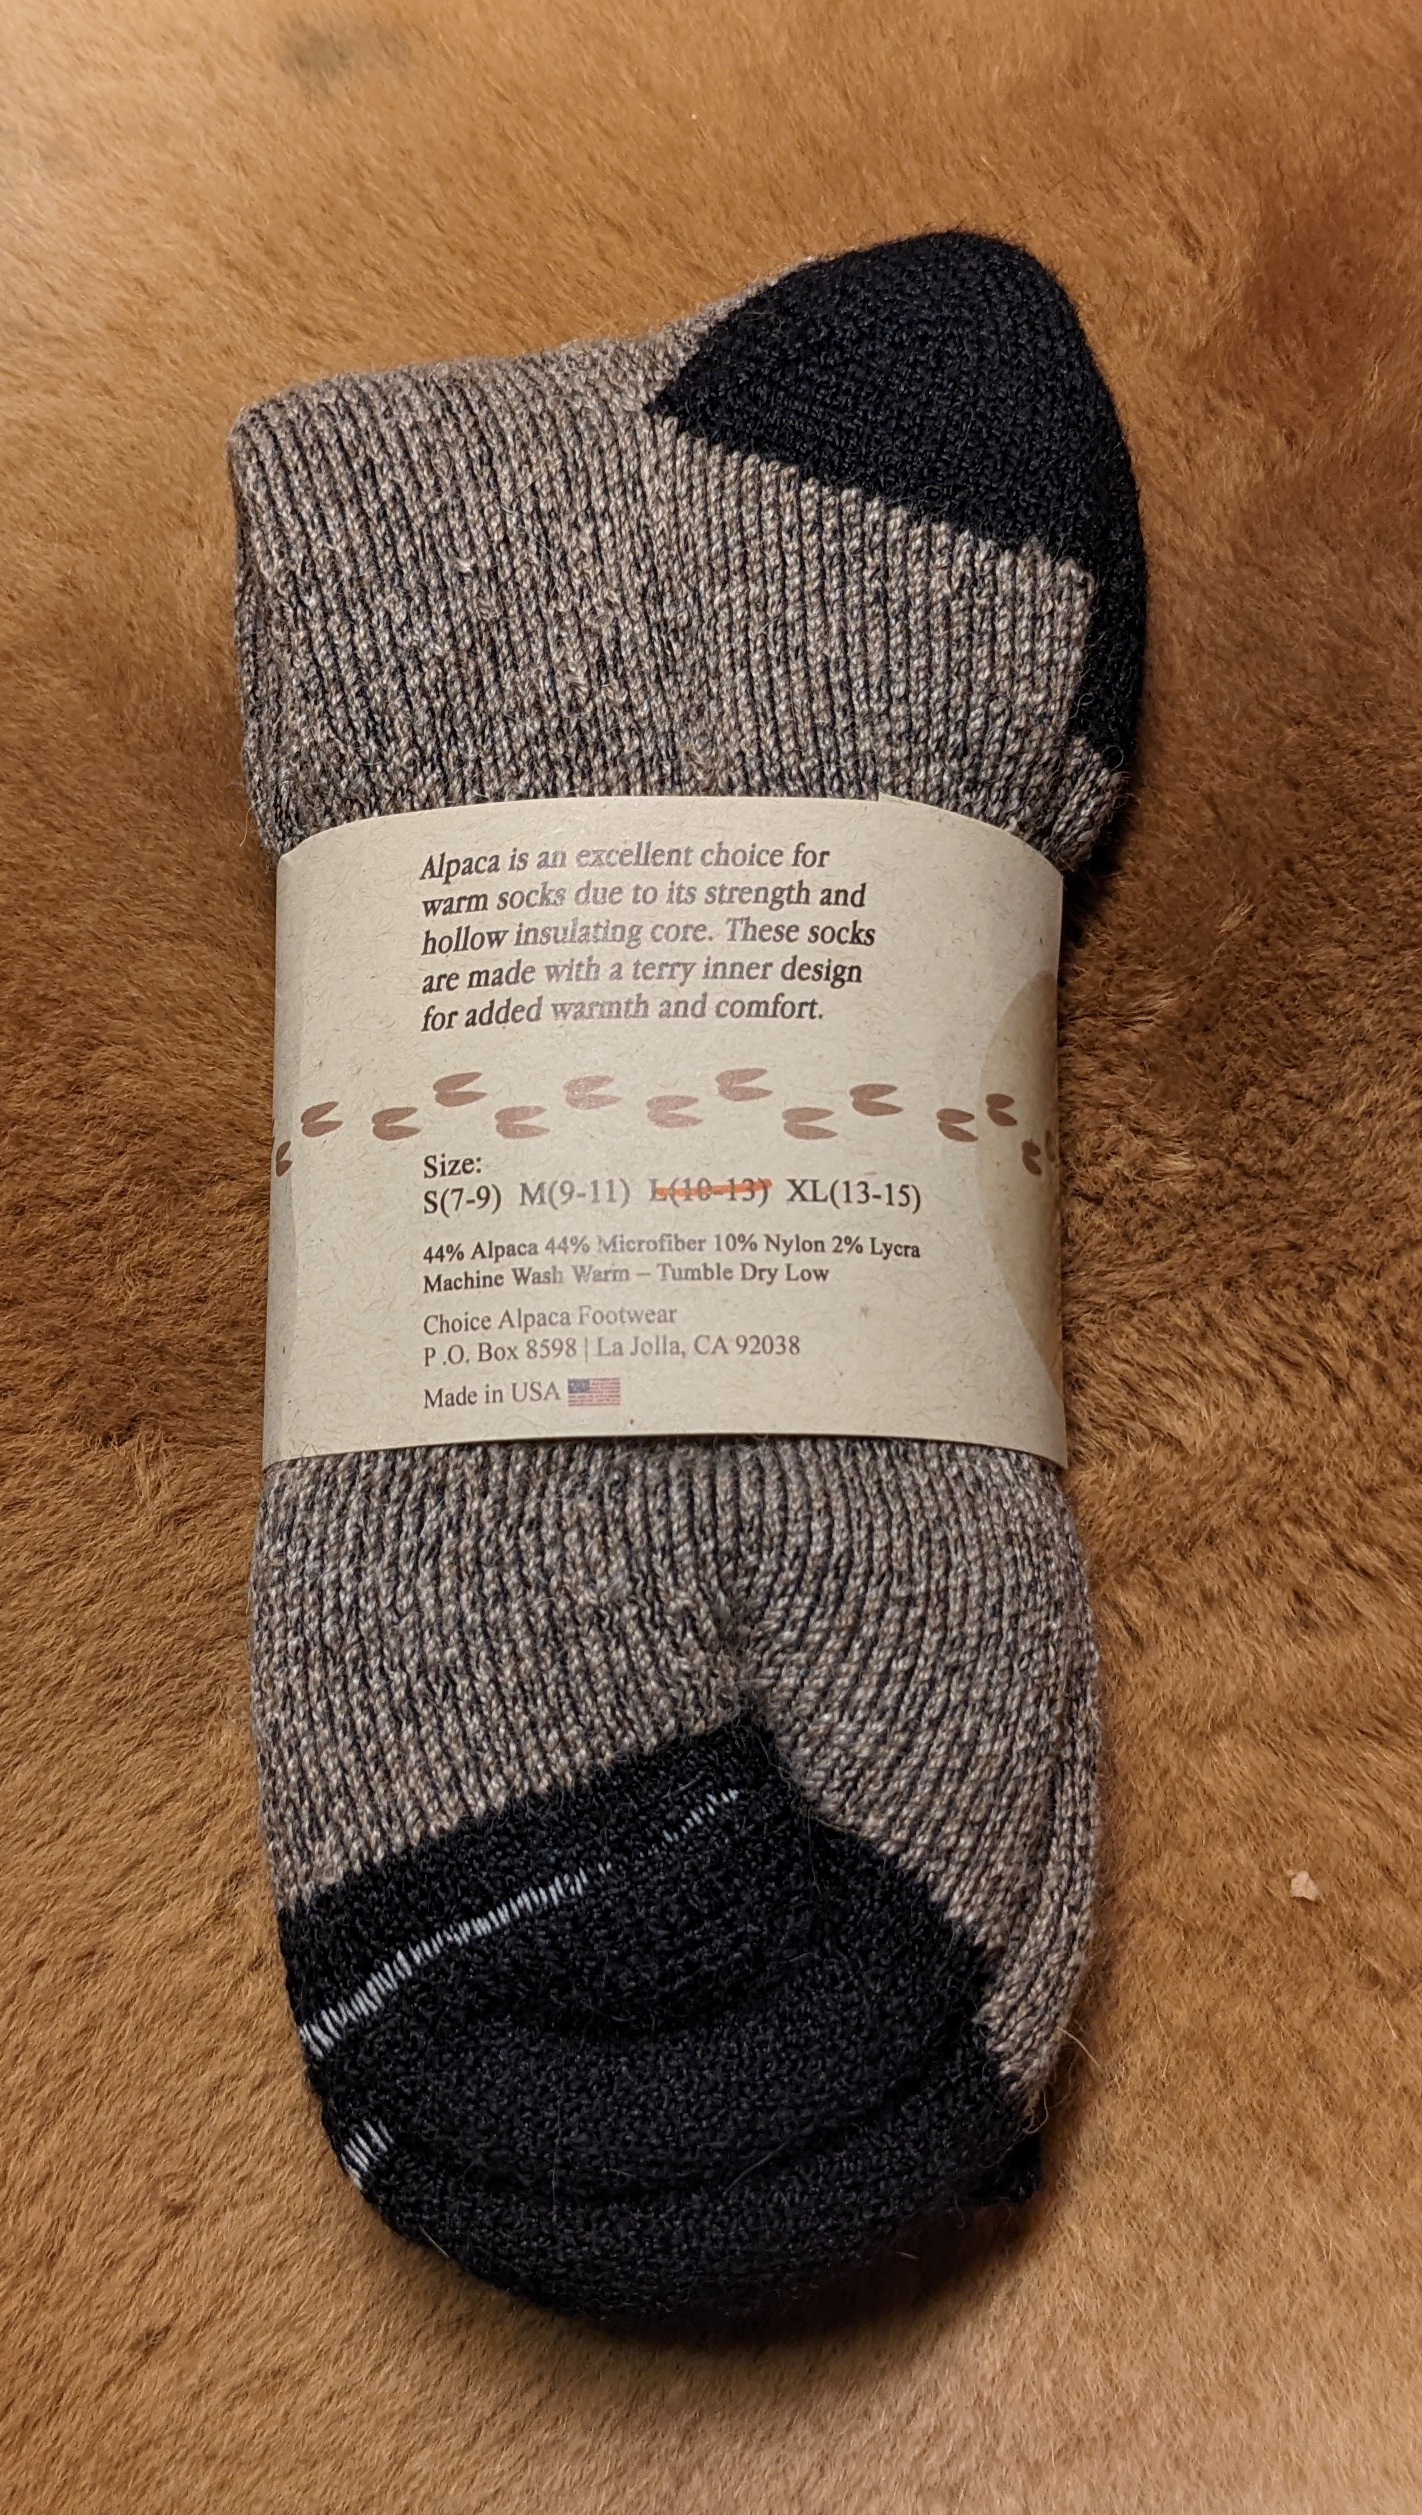
Opening the Package

The socks arrived in a USPS First Class Package. The return address was Purely Alpaca, 1444 Main St. #308, Ramona, CA 92065.

The labeling on the socks indicated that they are made in the USA. It also stated, “Alpaca is an excellent choice for warm docks due to its strength and hollow insulating core. These socks are made with a terry inner design for added warmth and comfort.” The wholesaler was identified as Choice Alpaca Footwear, PO Box 8598, La Jolla, CA 92038.

First Impressions

The outside of the socks felt very smooth and soft, and the terry design on the inside was quite cushiony. I pulled the socks on. They were very soft, warm, and breathable. I had the impression that they would make an excellent pair of slippers.

At first, I thought they might be a little thick for everyday wear. But as I wore them every day for a week, I found them to be extremely comfortable under a variety of shoes and boots during a variety of weather conditions. They remained odor-free throughout a full week of wear, washed up nicely in the laundry, and were soon ready for another week of wear.


When I put them on for a second week of wear, I was again impressed by how comfortable they are.

I…

Continue reading

20 Things You Should Start Hoarding

Print Friendly, PDF & Email

On 9/8, move here: https://urbansurvivalsite.com/things-you-should-be-hoarding-and-why/

Estimated reading time: 7 minutes

20 Things You Should Start Hoarding

Nearly everyone has a drawer, closet, or room filled with…well, stuff. The word ‘hoarding’ generally evokes terrifying images of a house overflowing with useless junk – newspapers from the past thirty years, every can or bottle the hoarder has ever drunk from, and a seemingly endless supply of containers, wires, screws, and other things lying all over the place.

But it’s not always a bad thing: Take a guess at how many of those things we just listed can be useful. It’s time to sort out the junk drawer. Here’s what you should be hoarding and why…

Want to save this post for later? Click Here to Pin It On Pinterest!

1. Packing Crates

Online orders often come in large wooden packing crates, and these are surprisingly sturdy. (If not, they can be sourced from local stores that receive their stock on wooden pallets or in crates.)

If you can get hold of a couple of these, they can be used to store almost anything – with a little finishing it’ll hold up well, even against the weather. Take them apart and, with a little DIY handiwork, you can transform it into something entirely new.

2. Newspapers and Magazines

Newspapers and magazines are often tossed away, but they make great kindling when you’re starting a fire. Newspapers are also (for the most part) sterile, which is why traditional fish-and-chips are served wrapped in newspaper.

Newspapers can also be used to transport or store breakables. (And, well, have you ever run out of toilet paper? Better old news than poison ivy.)

3. Potash

Potash is easily discarded, but can and should be saved up after a fire. It’s one component of homemade soap (the others being fat and water; there is a great recipe for this in the FM 21-76 US Army Survival Manual) and potash mixed into soil does wonders for the soil’s mineral content: Want to revitalize soil for the next harvest? Potash.

4. Empty Tins

Empty tins are always useful to store things in. Keep your empty tins because, whether it’s a coffee tin or a small Altoid tin, you’re bound to find a use for it at some point. You can also turn empty tins into everything from a lantern to a small, improvised stove: They’re way too useful to dispose of.

5. Soda Cans

You can turn an empty soda can into a myriad of things. Just a couple examples off of YouTube include a Wi-Fi booster, a popcorn maker, a soda can stove, a torch, and a camping water heater. Hell, you can even make chains from the tabs, thanks to this ingenious video from Grant Thompson – thanks!

6. Polystyrene

Polystyrene is not biodegradable and has a massive environmental impact, so don’t just throw it away.

When left to soak in gasoline, polystyrene…

Continue reading

Homesteading in Texas: What You Need to Know

Fertile soil, long growing seasons, mild climate, and an abundance of natural resources are just a few reasons Texas makes a perfect spot for homesteads. 

From the East Texas Piney Woods to the desert landscape of El Paso, Texas is rich with abundant agriculture, hunting, and fishing opportunities. 

Texas also offers very lenient homesteading, homeschooling, and cottage laws that give you some of the best opportunities to achieve the self-reliant dream.

Is Homesteading Legal in Texas

Not only is homesteading legal in Texas, it’s constitutional. According to the Texas State Constitution, any person can establish a homestead that is exempt from seizure in the event of foreclosure or economic hardship. 

Regardless of whether you live on a farm or in the middle of the city, you’re entitled to a homestead exemption. Not only does this secure your land for generations to come, but it also comes with a bit of a break on your property taxes. 

Texas Homesteading Laws

To declare a homestead, your property must be privately owned (not a corporation or partnership) and your primary residence. It also cannot include moveable assets like a boat or mobile home. If you choose to live in a mobile home, you must convert it to real property before including it in your homestead.  

Texas homestead laws are some of the strongest laws in the nation, providing substantially more protection than most other states. Whereas most states impose a dollar value on their homesteads, Texas does no such thing. Instead, it limits the size of the homestead to 10 urban acres or 200 rural acres.  

Is Going Off-Grid Legal in Texas

There are no state laws that prevent you from living off-grid, but certain locations do have zoning laws and deed restrictions that may prevent it. It may be a challenge to live off-grid on land that is zoned as residential or commercial, for example. However, if it’s zoned as farmland or recreational land, regulations are much more lenient. 

There are plenty of unincorporated communities throughout the state that have few, if any, zoning laws at all. Zoning laws vary across the state, but, as a general rule, the more populated the area, the stricter the zoning laws.  

In many areas, it is legal to disconnect from utilities, but it’s ultimately up to the building codes of the governing city or county authorities. However, stand-alone solar systems usually require a permit. 

Still, it is both legal and encouraged to use alternative energy in Texas, and the state offers many incentives for doing so. With Texas Tax Code Section 11.27, you can deduct the cost of installing solar- or wind-powered devices from your property taxes. 

Some areas even have programs that will install solar panels on your home at no cost, allowing you to become an independent energy provider.

Buying Land to Homestead in Texas 

PasturePasture

Until recently, land in Texas was relatively affordable. However, with the recent…

Continue reading here

Utilities Costs at a Remote, Off-Grid Home, by Mrs. Alaska

I have been asked: How much do utilities cost at our remote, off-grid home?

Since we live 40 miles from the nearest road, we receive no municipal services. No mail, electricity, telephone, Internet, water lines, or garbage pick up. Certainly no fire or police protection. So, if we want any of these conveniences, we have to make them happen ourselves. The bad news is that this involved high up-front costs and delays of several seasons and even years for both the materials and transportation. The good news is that the ongoing costs are very low.

People who are willing to live without most modern conveniences can certainly live very cheaply in a remote area, but if you want some modern services, such as utilities, you will certainly pay a lot more up front, and, in some cases, ongoing, for what is often inferior to the service in a city.

Since we have lived full-time out here for over a decade now, I thought I would summarize our upfront and ongoing costs for basic utilities and taxes. In cases of expensive infrastructure, I will amortize the costs over 10 years.

Taxes: Up to age 65, our property taxes ranged between $215 and 250 for five acres. When the first of us turned 65, we no longer have to pay taxes in Alaska on properties worth less than some threshold amount.
Mail: Many rural communities have no home delivery of mail. That is true for the closest community (2,000 people) to us. Like everyone else, we rent a P.O. box. The size we chose costs $300/yr. For some items that cannot be delivered to a post office box, a friend accepts delivery in a nearby town that does have home delivery. Because we have no street address (no roads!), it has sometimes been challenging to fill out forms for new bank accounts or credit/debit cards. Alaskans “get this” but other service providers have been stymied when I had to send them our PLAT number, which is the sort of geographic descriptive numbers you may have seen on the title to your home.

Trash and Garbage: $0. Because we raise so much of our food, and make others, like wine, beer, bread, and condiments, we do not accumulate much trash other than packaging. We repurpose what we can, burn paper and cardboard as fire starters in the woodstove and hot tub firebox, and haul back to a town dump any broken or unused glass and cans. Recycling is quite limited in Alaska. Almost all kitchen garbage goes into the gardens or is fed to the animals. (In many neighborhoods, residents pay extra to install bear-proof garbage cans.)

Electricity: For $12,000, my husband assembled a 120-foot guy-wired tower and mounted on it (included in the $12,000) a 1 kw wind turbine, 4 solar panels (we added 6 on a turning pole later, after prices plummeted), an antenna that he pointed to a telephone repeater 40 miles away, satellite dish for Internet, and other antennae…

Continue reading

Charge Your Garden Tools With Solar Power

Ongoing improvements to batteries have helped increasing numbers of gardeners to cut the cord—and the need for gasoline—for their string trimmers, edgers, lawn mowers and other gadgets. These days, in fact, you can even find heavy-duty equipment such as tillers, chainsaws and wood chippers powered with long-lasting rechargeable batteries.

Maybe you’ve already replaced some of your older gas-powered tools with electric or fully rechargeable, cordless models. To save money in the long-run—and go even greener—consider setting up your very own portable, solar charging station for your garden tools.

“In terms of having an off-grid charging center for your tools, that’s a relatively simple setup,” says EcoFlow’s Ryan Oliver, head of communications for North America. Established in 2017, EcoFlow specializes in portable power and renewable energy. “You can use a solar panel directly connected into a large storage battery and then with that large battery, the power station would be charging your individual [tool] batteries,” he says. “There’s enough capacity in these portable solar panels these days combined with putting that into a battery that you’re going be able to power a lot of outdoor tools.”

Small-Scale Solar

In some areas, professional landscapers have already begun transitioning to portable, solar systems to charge their garden tools. “There are rules being set up in local jurisdictions around the country banning the use of gas-powered, outdoor tools,” Oliver says. “So, you’re going to see landscapers actually installing solar arrays on their vans and using that to charge a battery system, which is ultimately going to charge the individual batteries that their tools require.”

Unlike large, permanent solar panels connected to the established electrical grid, portable solar panels and their connected battery packs are much smaller, less expensive, and can be operated independently from the electrical grid for ease of charging things like garden tools on the go. “A lot of our stuff is used by campers and outdoor enthusiasts,” Oliver says. 

While older panels are large and rigid, many new solar panels are designed to be more mobile. Some even collapse for extra portability. Nevertheless, when establishing your a solar charging station for you garden tools, Oliver says, “The idea is you would keep your solar panel and the portable power station in an area where it’s not going to move much.” 

Subscribe nowSubscribe now

That could mean mounting the solar panel outdoors and sheltering the connected battery pack inside a nearby barn, garage or greenhouse. (Incidentally, the battery pack itself doesn’t take up much space. A 250-watt, portable battery pack is typically about half the size of a toaster. A much larger, 3,600-watt battery is roughly the size of a desktop computer.)

solar garden toolssolar garden tools

Components & Costs

If you’re the DIY type, you can choose the individual components, including a solar panel, battery pack and inverter on your own. (An inverter is a piece of equipment…

Continue reading

Choose the right knife for small game hunting – Survival Common Sense Blog

You can skin and field dress squirrels, rabbits, upland game and smaller animals with many different styles of knives. Here’s how to pick one that can do the job, without breaking the budget.

by Leon Pantenburg

Harvest a limit of squirrels, rabbits or upland game, and you’ll soon learn what knife works best for field dressing and cleaning the carcasses. Some skill and a sharp knife makes the job easy; a large, unwieldy piece of cutlery makes it a chore.

I made this knife and cardboard sheath 40-some years ago. The blade is quite usable and the sheath still does its job quite well! It doesn't work all that well for small game cleaning.

I made this knife and cardboard sheath 50-some years ago. It doesn’t work all that well for small game cleaning.

Generally speaking, when it comes to processing small game, smaller is better. A large Bowie-style knife is a really bad choice for this task, and it only takes one session with your large  survival knife to prove that.

Likewise, the wide, stubby blade of a big game skinning knife isn’t the best choice either.

During my formative years of small game hunting in Iowa, I was enamored with the concept of  a large hunting knife. I couldn’t afford one, so that lead, at age 13,  to my first foray into knife-making.

After a lot of grinding and work, I made a clip point hunting knife with a six-inch blade. I didn’t have any leather, so a temporary sheath was made out of cardboard and tape. Today, 50-some years later, that combo resides in my gun cabinet.

Though the blade held an edge well, it didn’t take long to figure out it was too big for much besides stabbing bears and hand-to-hand combat. I habitually carried a pocket knife, as all farmboys did, and ended up using it for all my small game work. A standard middle-sized Stockman with a clip, a sheep’s foot and a spey blade was all I ever needed until I took up big game hunting.

Before buying anything, here are some attributes to look for in a small game knife:

Ease of sharpening: In Iowa, the daily bag limit for rabbits was 10, and my hunting buddies and I might limit out. The same thing could happen with pheasants or quail. A successful hunt could mean a long processing session. A three-bladed pocket knife was a good tool choice, because when one blade got dull, I could switch to another. But no matter what knife you choose, it needs to be easy to sharpen and must hold an edge well.

These folders (from top) Bucklite, Winchester Trapper, Puma Bird Hunter and Opinel have all worked well as small game knives.

These folders (from top) Bucklite, Winchester Trapper, Puma Bird Hunter and Opinel have all worked well as small game knives.

Easy to carry: When small game hunting, I like to field dress…

Continue reading here

How to Treat Severe Burns Off-Grid

Advertisement

Print Friendly, PDF & Email

Estimated reading time: 21 minutes

How to Treat Severe Burns Off-Grid

Many of us have experienced a burn at one time or another. Fortunately, most of us have only endured 1st degree or 2nd degree burns resulting in blisters but no serious damage. Anyone who suffers a 3rd degree burn or worse has usually been rushed to a hospital for immediate treatment and long-term medical care.

But what do you do when the hospitals are too distant, overwhelmed, or in extreme circumstances –simply closed or unreachable? Explorers, backpackers and people living in remote locations often have both the supplies and expertise to deal with significant injuries, including burns. But most of us may be at a loss when the bad burns happen.

Article continues below.

Want to save this post for later? Click Here to Pin It On Pinterest!

Beyond Basic First Aid

OLD FIRST AID KIT

Severe burns often require medical equipment and supplies you won’t find in a standard first aid kit. Even something as basic as severe sunburn may challenge the average kitchen first aid kit.

There’s also a question of first aid knowledge for burns. A lot of us know what to do with a cut or even a deep wound or broken bone. How many of us know how to recognize the difference between a 3rd and 4th degree burn, and what to do about it?

A 3-Step Review

To begin, we’re going to cover the 5 basic types of burns and how to diagnose them. Then we’ll explore the common and not so common occurrences that result in burns. Finally, we’ll go over immediate first aid steps, supplies and most important –continuing care of someone who has suffered a burn.

REMOTE ROAD

All of this assumes no doctors or hospitals are available either because of your location or the surrounding situation.

We’ll also cover some resources for traditional and ancient herbal medicines for burn treatment that may be necessary in an off-grid environment without access to professional medical care.

1. The 5 Degrees of Burns

Each degree of a burn is progressively more serious. The most common are 1st and 2nd degree burns but the more severe 3rd and 4th and 5th degree burns can happen to anybody.

1st Degree Burns

1st degree burns happen every day. The usual symptom is a feeling of painful heat at the sight of the burn, redness, itching, dryness and irritation. Anytime the affected area comes in contact with a surface or touch, the pain increases.

A 1st degree burn is sometimes referred to as a superficial burn because it only affects the outer layer of skin (epidermis). 1st degree burns do not form a blister and usually heal within 3 to 6 days without scarring.

2nd Degree Burns

2nd degree burns are also common. Blisters are the primary symptom in addition to redness, swelling and pain. If the…

Continue reading

5 Productive Garden Vegetables Every Homestead Should Grow

There are few things worse than spending a small fortune on a garden just to grow a tomato or two. Gardening can be expensive. Gardens are a huge time commitment and, honestly, a lot of work. So, it’s important to select the right varieties of garden vegetables to make all of that worth it!

We know that you want to have mountains and mountains of produce from your garden to justify all that investment of time and money. So here are five of the most productive high-yielding vegetables every gardener should grow!

Tomatoes

Tomatoes are one of the most productive and highest-yielding vegetables of the summer garden. One packet of tomato seeds can produce a dozen tomato plants, each of which can yield pounds and pounds of tomatoes. 

Tomatoes are typically categorized by indeterminate or determinate varieties. Indeterminate tomato varieties will continue to grow and produce tomatoes all season long. These varieties produce huge quantities of delicious tomatoes over the course of the season.

Determinate tomato varieties do not produce tomatoes as long into the season. Instead, the fruit of determinant tomato varieties ripen simultaneously, making this an ideal crop for canning and saucing!

Whether you choose determinate, indeterminate, or a mixture of both, tomatoes—when properly cared for—can produce very large crops of delicious summertime fruit.

Subscribe nowSubscribe now

Salad Greens

Every good garden has a few greens planted here and there! Greens are potentially one of the most productive and high-yield crops per square foot in the garden. Lettuces, spinaches, kales—they can all be very prolific.

Just one packet of seeds can keep you eating more greens than you ever thought possible!

The most wonderful thing about growing greens is that they can be planted in small spaces and almost anyone can find the garden space to grow some greens! They also thrive in cooler weather, which can extend your growing season and therefore extend your overall season’s productivity. 

Squash

Everyone who has grown summer squash knows just how much squash one plant can produce. One day your baby zucchini is tiny, and the next it could feed 10 people—with some to spare!

Summer squash (as well as winter squash) can be very prolific in the garden and produce pounds and pounds of squash. Summer squash varieties, such as yellow squash or zucchini, are among the most productive, producing bumper crops of squash.

Planting a mixture of winter squash and summer squash can produce a longer stand of food as well. Winter squash, such as butternut squash, can be stored for months, while summer squash should be eaten or preserved promptly after harvest. Overall though, few vegetables are as high yielding as the squash family!

Beans

Beans are super producers in the garden! I remember vividly spending long, hot summer days harvesting green beans in the garden every single day, and snapping them and canning them almost every single evening. It always seemed like the…

Continue reading

How To Grow A Survival Garden FAST

Advertisement

Print Friendly, PDF & Email

Estimated reading time: 18 minutes

How To Grow A Survival Garden FAST

If you had one year before you knew everything was going to fall apart, how would you address your food supply situation? Would you jump up and run to the store to buy a bunch of canned goods or maybe you would purchase several emergency food buckets?

Neither of those are bad options but two problems arise. You can probably only buy so much food and eventually that food will run out. At the point when you need more food, buying it may not be an option. You need a source of sustainable food and you need it now.

Article continues below.

It’s time to put on some work gloves and find your green thumb because today we are going to discuss setting up a survival garden quickly.

Want to save this post for later? Click Here to Pin It On Pinterest!

Survival Garden 101

Before you even stick a shovel into the ground there are a few things to keep in mind that will help you get off to a good start and have a successful food supply.

Investment

GARDEN TOOL SHED

Unless you already have some of the tools and supplies associated with gardening, there is going to be a bit of an upfront investment. Like any project or hobby, the sky’s the limit in terms of what you can spend, but gardening in itself doesn’t have to be expensive. Just remember, what resources you put into a food garden now, will pay huge dividends down the road.

Work and Time

WOMAN IN GARDEN

A garden will require your time and energy to set up and maintain. The key, however, is consistency. If you remain disciplined about tending to a garden every single day then you will avoid having to spend hours at a time on one specific task, such as weeding.

Timing

SPROUTING PLANT

The timing of planting and harvesting is something you also need to be aware of. Dropping some seeds into the ground isn’t going to provide food in a few days. Anything of substance is going to take almost 60 days or more to grow. This is why it is so important to lay down the foundation of a garden long before your main supply of food runs out.

Available space

URBAN GARDEN

Before buying any tools or supplies, take a look around your property and figure out the space you have available for gardening. This includes the back, sides, and front of your home. If you have zero outdoor space, you can still have a garden but will have to opt for growing indoors. Keep a sharp eye and utilize any available space.

For more information on garden space-saving tips, click here.

Preservation

CANNED TOMATOES

It’s important to have methods of preserving…

Continue reading

Recipe of the Week: Fruit or Berry Cobbler Cupcakes

The following recipe for Fruit or Berry Cobbler Cupcakes is from SurvivalBlog reader Mike in Alaska.  It is his variant of a recipe that he found elsewhere.  Note: This recipe was originally developed for use with peaches or nectarines. It will also work for many types of berries.

Ingredients
  • 1 1/2 c. flour
  • 1 1/4 tsp. baking powder
  • 1/4 tsp. baking soda
  • 1/2 c. unsalted butter, at room temperature
  • 3/4 c. brown sugar
  • 1/4 c. white sugar
  • 2 eggs
  • 1/2 c. sour cream
  • 1 tsp. vanilla
  • 1 1/4 c. ripe fruit or berries, chopped.
Directions
  1. Pre-heat your oven to 350 F.
  2. With a fork, whisk flour, baking powder, and baking soda in a bowl, and set that aside.
  3. Beat butter and the two sugars in a large bowl for 1 minute until light and fluffy.
  4. Beat in the eggs, sour cream, and vanilla until blended.
  5. Mix in the flour mixture that you set aside.
  6. Fold in the fruit.
  7. Fill cupcake liners or greased tins half full.
  8. Bake at 350 degrees F for approx. 25 minutes or until a test toothpick comes out of cupcake clean.
SERVING And STORAGE

Can be served after slight cooling. These will keep in a refrigerator for a day or two, but there are usually none left over!

Do you have a well-tested recipe that would be of interest to SurvivalBlog readers? In this weekly recipe column, we place emphasis on recipes that use long-term storage foods, recipes for wild game, dutch oven recipes, slow cooker recipes, and any recipes that use home garden produce. If you have any favorite recipes, then please send them via e-mail. Thanks!

Continue reading